
The best backyard landscaping ideas do not start with plants. They start with a plan for how you will actually use the yard — where you will sit, eat, walk, and relax — and then they build the planting around that life. A yard with a clear layout, one good patio, a path that goes somewhere, and planting in layers feels designed even before a single flower blooms. A yard with scattered shrubs and no structure never does, no matter how much money went into the plants.
That is the difference between landscaping and decorating a yard. Landscaping is the structure underneath: the ground you walk on, the edges that hold the space together, the shade overhead, and the planting that softens it all. Get the structure right and the yard works in every season. Get it wrong and you end up with a lawn nobody sits on, a patio that bakes in the afternoon sun, and beds that need constant rescue.
These 15 ideas work in that order — layout first, hardscape second, planting third, light and finishing last. Use the ones that fit your yard and your budget, and skip the rest without guilt. A small yard done well beats a large yard done halfway, every time.
How To Think About A Backyard Before You Start?
Before you buy anything, walk your yard at three different times of day and answer three honest questions. The answers rule out half the ideas in this article before you spend a dollar, and that is a good thing.
Where does the sun fall, and when? A patio that gets full afternoon sun will sit empty in July. A bed that gets four hours of morning light will not grow the roses you pictured there. Watch the shadows at breakfast, at lunch, and at dinner. The shady corner you thought was useless may be the best seat in the house on a hot afternoon.
Where does the water go? After the next heavy rain, look for puddles and muddy tracks. Water that pools against the house or in the middle of the lawn is a drainage problem, and no amount of planting fixes it. Slope hard surfaces gently away from the house, and give low spots gravel or planting that likes damp feet instead of turf that will drown.
How much time will you really give it? Be honest. A yard that gets an hour a week needs different plants than a yard that gets a full Saturday. Ornamental grasses, evergreen shrubs, and groundcover ask for one annual cutback. Roses, vegetable beds, and fussy perennials ask for regular attention. There is no shame in choosing the low-maintenance list — a yard you can keep up with always looks better than a yard you meant to keep up with.
One more habit worth building now: measure before you shop. A tape measure and a rough sketch on paper will save you from the two most common mistakes in backyard landscaping — a patio too small for its furniture and a tree planted where its mature canopy will swallow the whole yard. Rough sizes are given with every idea below so you can check them against your own ground.
1. Start With Zones Before You Buy A Single Plant

Every yard that feels designed has the same secret: it is divided into zones, and each zone has one clear job. The dining zone is near the back door. The lounging zone sits where the afternoon shade falls. The open lawn stays open for kids, dogs, or a game of catch. The planting hugs the edges. And the messy, necessary stuff — the bins, the hose, the compost — gets its own small screened corner instead of drifting around the yard.
Start with three zones and a service corner. One zone for gathering (patio or deck), one planted edge along the fences, and one open flexible zone that can be lawn or gravel. Then add the service corner — a strip three feet wide behind a screen of shrubs or a simple slatted panel, with the bins, the hose reel, and the tools. Hide that corner properly and the rest of the yard suddenly looks finished.
Lay the zones out with a garden hose on the grass before you dig anything. Hose lines are free to move, and walking the shape for a week tells you more than any drawing. Does the path from the back door to the dining table feel natural, or do you cut the corner every time? Is the lounge zone far enough from the grill smoke? Move the hose, not the pavers.
Tip: Keep one zone deliberately empty. A yard with no breathing room feels cluttered no matter how nice each piece is. The open lawn or a stretch of plain gravel is not wasted space — it is the pause that makes the planted parts look intentional.
2. Size The Patio To The Furniture, Not The Leftover Space
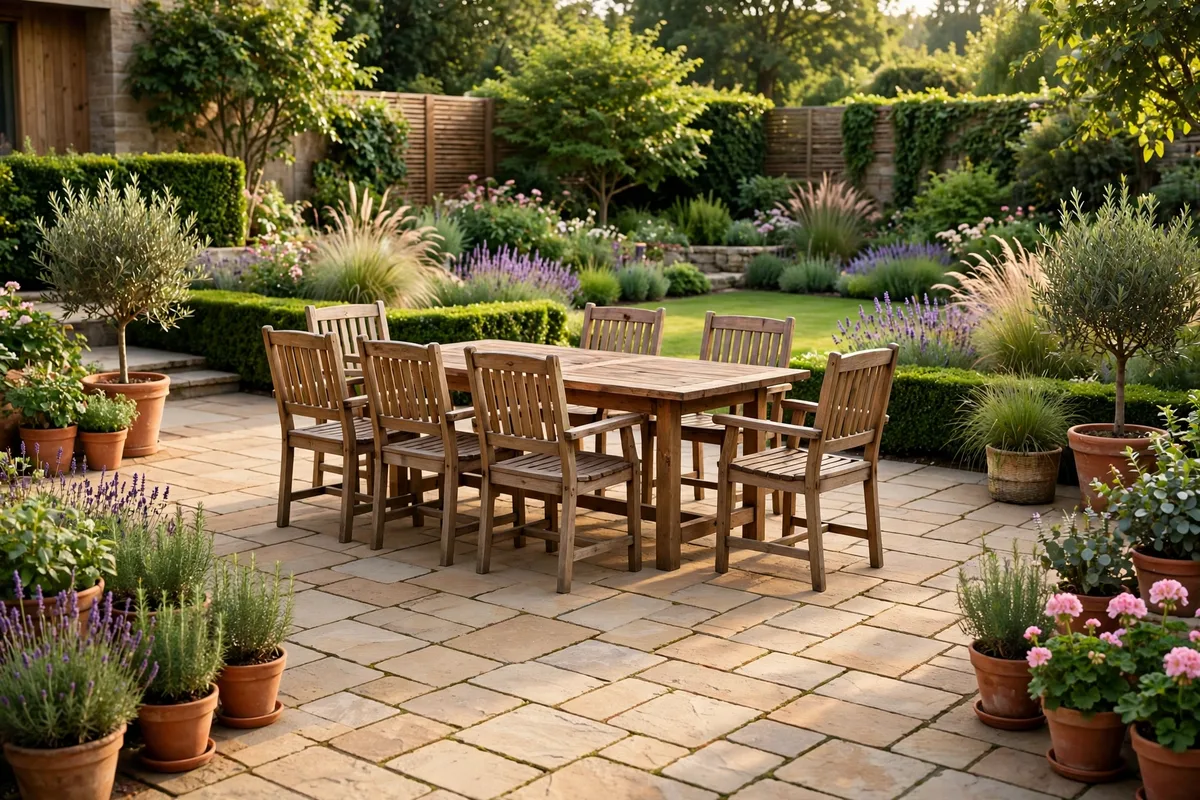
The most common patio mistake is building it too small. A 10-by-10-foot slab sounds generous until a table and four chairs arrive, and then nobody can pull a chair out without stepping off the edge. Furniture wobbling on the lawn is the fastest way to make a patio feel like an afterthought.
Measure the furniture first, then the patio. A small round table with four chairs needs at least 10 by 10 feet. A six-seat rectangular dining set wants 12 by 14 feet, with 30 to 36 inches of clear space behind the chairs so people can stand up without a shuffle. A lounge setup with a sofa and two chairs needs about 12 by 12 feet. Add the numbers together before you order a single paver.
Material sets the mood as much as the size does. Concrete pavers in a warm grey read clean and modern. Natural flagstone in sandstone or slate feels softer and suits older homes. Brick brings warmth and pairs beautifully with a red-brick house. Whatever you choose, repeat one material from the house — the brick of the chimney, the charcoal of the roof trim, the cedar of the fence — so the patio looks like it belongs to the home rather than dropped onto it.
Tip: Put the patio within 8 to 15 feet of the back door unless the best shade is elsewhere. Too far, and weeknight dinners stay indoors. Close enough, and carrying plates out becomes a habit instead of a production.
A compacted gravel base underneath keeps everything level for years, and a firm metal edge stops the pavers from creeping outward. Skipping the base is the shortcut that shows up a season later as a sunken corner and a wobbling table.
3. Curve A Planting Bed Around The Lawn

A rectangular lawn with shrubs dotted around it looks like a field with decorations. A lawn wrapped in one generous curved bed looks like a garden. The curve does the work: it breaks up the straight lines of the fence, gives the eye something to follow, and turns the lawn into a shape instead of a leftover.
Make the bed 3 to 5 feet deep. Shallow beds force shrubs to press flat against the fence, and they never look right. Three feet of depth lets a shrub mature without crowding the fence, and five feet lets you layer — tall at the back, medium in the middle, low at the front — which is where the designed look actually comes from.
Plant in groups of three or five of the same variety rather than one of everything. Five lavender plants in a drift read as a decision. Five different plants in a row read as a garden-center impulse buy. Repetition is what makes a bed look calm and professional, and it makes watering and pruning simpler too.
Tip: Cut the curve with a garden hose first, then edge it with a half-moon edger or steel edging. A crisp edge between lawn and bed is the single cheapest upgrade in landscaping — it takes an afternoon and changes the whole yard overnight.
Fill the bed with a mix of evergreen structure and seasonal color. Evergreens hold the shape through winter. Perennials and ornamental grasses bring the movement and the flowers. Mulch the whole bed two to three inches deep and the weeds stay down while the soil holds moisture.
4. Lay A Stepping Stone Path That Goes Somewhere

A path is not decoration. It is the route between the places people actually go — the back door to the fire pit, the patio to the garden shed, the side gate to the vegetable beds. When the path follows the route people already walk, the lawn stops wearing a muddy track and the yard starts to feel connected.
Set the stones to a comfortable stride. Large slabs at least 18 by 24 inches, spaced 4 to 6 inches apart, feel natural underfoot. Small stones set far apart make everyone hop. For a path two people walk side by side, go 36 inches wide; a single-file garden path can be 24 inches. Gravel between the stones fills the gaps, drains well, and keeps the look relaxed.
Let the path curve gently instead of running dead straight. A straight path is efficient, but a gentle curve slows the walk down and reveals the yard in stages — the fire pit appears around the bend, the bench comes into view after the turn. That sense of discovery is what makes a small yard feel larger than it is.
Tip: Line the path with low planting rather than tall shrubs. Lavender, catmint, or low ornamental grasses brush the ankles and smell wonderful when you pass. Tall plants beside a narrow path close it in and make it feel like a corridor.
If the route crosses a slope, turn the path into two or three wide, shallow steps instead of a steep ramp. A step 12 inches deep and 6 inches high is easy to walk and easy to mow around.
5. Layer Planting In Three Heights

Flat planting looks flat. A bed where everything grows to the same height reads as a hedge with gaps. Layered planting — tall at the back, medium in the middle, low at the front — gives the eye depth, and depth is what makes a yard feel bigger and more finished.
Think in three planes. The background sits against the fence or wall: tall shrubs, a small tree, or a climbing vine on a trellis, roughly 6 to 8 feet at maturity. The midground holds the heart of the bed: medium shrubs and perennials, 2 to 4 feet tall, planted in drifts of three or five. The foreground is the detail layer: groundcover, low perennials, and grasses under 18 inches that soften the edge where bed meets lawn.
Cool colors recede and warm colors advance, which is a quiet trick worth using. Blues, purples, and deep greens at the back push the fence away. Warm reds, oranges, and yellows up front pull the eye toward the patio. It is a small choice that changes how deep the yard feels.
Tip: Repeat one plant in all three layers in different spots. A grass that appears at the back of one bed and the front of another ties the whole yard together, the way a repeated color ties a room together.
Leave room for growth. A shrub that is two feet wide today may be five feet wide in three years, and a bed planted to look full in its first summer will be a crowded mess by its third. Plant for what the yard will look like in year three, not year one.
6. Plant One Shade Tree Over The Afternoon Seating

One well-placed tree does more for a backyard than a dozen shrubs. It cools the seating area, frames the view, gives birds a home, and anchors the whole design. A yard with a tree has a center of gravity. A yard without one can feel exposed no matter how much planting it has.
Pick the mature canopy first, then the tree. A tree that grows 30 feet wide will swallow a small yard and shade the vegetable beds you wanted sunny. A narrow canopy — a columnar or upright variety — fits a tight lot and still gives real shade. Check the mature height and spread on the label, not the size in the pot, and keep the trunk clear of paving so the roots have room.
Place the tree where the afternoon sun hits the seating, not in the middle of the lawn. Afternoon sun is the harsh one. Morning sun is gentle and welcome at breakfast. A tree on the west side of the patio throws shade exactly when you want it and lets the morning light through.
Tip: Plant the tree before you build anything underneath it. Hardscape and furniture placed over young roots get lifted and cracked as the roots grow. Give the tree a wide mulch ring — three feet across, a few inches deep, kept off the trunk — and it will establish faster than one planted in a tight lawn circle.
If you have no room for a full tree, a large multi-stem shrub or a vine-covered pergola gives a similar feeling of shelter in a smaller footprint. The point is overhead cover, not the tree itself.
7. Soften The Patio Edge With Low Planting

A patio that ends abruptly at grass looks like a slab that was delivered and left there. A patio with a soft planted edge looks like it grew out of the garden. The difference is twelve to eighteen inches of low planting along one or two sides — the smallest change in this list, and one of the most visible.
Use low plants, not tall ones. Groundcover, dwarf shrubs, and grasses under two feet keep the view open while hiding the hard line where paving meets lawn. Lavender, catmint, creeping thyme, and low ornamental grasses all work, and they handle the heat that bounces off stone in summer better than thirsty perennials.
Choose plants that do not drop debris onto the seating. Trees and shrubs that shed heavy seed pods, sticky sap, or constant leaf litter right next to a dining table mean sweeping before every meal. Check the habit before you plant, not after.
Tip: Let the planting spill slightly over the patio edge. A few stems leaning over the stone break the straight line and make the patio feel settled. Keep the spill light — a couple of inches, not a jungle — so chairs still sit flat.
8. Build A Fire Pit Circle On Gravel

A fire pit is the fastest way to make a backyard social after dark. It pulls chairs into a circle, gives everyone a place to look, and turns an ordinary evening into the part of the day people remember. The trick is giving it a proper setting instead of dropping a metal bowl on the lawn.
Set the pit on gravel, not grass. A 40- to 48-inch fire ring on a bed of pea gravel or crushed stone drains instantly, never turns to mud, and keeps the heat off the lawn. Border the gravel with low steel or stone edging so it stays contained, and leave 3 to 4 feet of clear space around the pit on every side for chairs and safe movement.
Keep the pit a sensible distance from the house, the fence, and any overhanging branches, and check local fire rules before you build — many areas set a minimum distance from structures and property lines. A gas insert lights instantly, makes no ash, and shuts off fast if the wind picks up, which is worth considering if you have kids or a small yard.
Tip: Plant heat-tolerant perennials around the edge — lavender, Russian sage, and ornamental grasses handle the radiant warmth and the occasional spark far better than thirsty annuals. They also smell wonderful when the evening warms up.
For more on sizing and placement, see our guide to backyard fire pit ideas and landscaping. If the fire pit becomes the evening hub, the rest of the yard can stay simpler — one good gathering spot beats three half-used ones.
9. Terrace A Slope With Low Retaining Walls

A slope that is too steep to mow and erodes after every rain feels like wasted ground. Terracing turns it into the most interesting part of the yard: a series of flat, plantable levels, each one held by a low wall, each one easy to walk and easy to care for.
Keep each level at least three feet deep. Narrow tiers look fussy and leave no room to plant anything substantial or to reach in and weed. Three feet of depth per level gives shrubs room to grow and gives you room to work. Use stone, timber, or concrete block — stone looks the most natural, timber is the easiest DIY option, and block is the most forgiving for a first build.
Drainage behind the wall matters more than the wall itself. Gravel backfill and landscape fabric behind each wall let water escape instead of pushing the wall over, and a slight backward slope on each tier stops water pooling at the base. Walls taller than a couple of feet, or any wall holding back a serious slope, are worth a professional’s eye and a check of local building rules before you start — a failed retaining wall is expensive and can be a safety problem.
Tip: Plant each tier differently. Herbs and vegetables on the sunny top tier, ornamental grasses in the middle, shade-tolerant ferns and hostas on the lowest, dampest level. The slope becomes a tour instead of a problem.
Where a full terrace is more than the budget allows, deep-rooted groundcover and ornamental grasses planted straight into the slope will slow erosion and hold the soil while you save for the walls. It will not fix a steep grade on its own, but it buys time and looks far better than bare dirt.
10. Turn The Fence Into A Mixed Border

A bare fence is the longest straight line in the yard, and the eye goes straight to it. A mixed border along the fence breaks that line, softens the boundary, and gives the yard a green wall that changes with the seasons. It is also the most effective privacy upgrade that does not involve building anything taller.
Mix heights instead of planting one row. Tall shrubs or a small tree at the back, medium perennials in the middle, low groundcover at the front. A single row of identical shrubs creates privacy at one height only — a second-story window or a sloped neighbor’s yard sees straight over it. Layers close the gaps at every height and look far more intentional than a wall of green.
Evergreens hold the screen through winter. Arborvitae, holly, and boxwood are reliable, but do not plant a single species along the whole fence — one pest or disease can wipe out the entire screen. Mix two or three evergreens with deciduous shrubs and ornamental grasses, and the border survives whatever hits one variety.
Tip: Leave a narrow gap — about a foot — between the fence and the back row of plants. It lets air move, keeps the fence from rotting against damp foliage, and gives you room to paint or repair the fence later without digging anything up.
Climbing plants do the same job in almost no ground space. A trellis panel six to eight feet tall against the fence, planted with clematis, star jasmine, or climbing hydrangea, turns a flat wall into a green one in a single season. Check first whether the fence is shared with a neighbor before attaching anything permanent to it.
11. Add A Small Water Corner For Sound And Calm

Most backyards are missing one sense: sound. A small water feature — a compact tiered fountain, a wall-mounted spout, or a bubbling stone — adds the steady sound of moving water, and that sound changes how the whole yard feels. It masks street noise, gives the eye a focal point, and turns a quiet corner into a destination.
Keep it small and near seating. A fountain two or three feet across, placed where you can hear it from the patio, does more than a large pond at the far end of the yard. Solar-powered options need no wiring across the lawn and are the easiest place to start. A simple recirculating pump keeps the water moving, which keeps it clear and stops it stagnating.
Stone edging and a few moisture-loving plants around the base make the feature look settled rather than placed. Ferns, hostas, and ornamental grasses suit the damp edge, and a couple of smooth river rocks give the water somewhere to land and catch the light.
Tip: Put the water feature where the evening light hits it. Moving water catches low sun beautifully, and the sound carries further in still evening air — exactly when you are most likely to be sitting outside.
A full pond is a bigger commitment — liner, pump, fish, and regular care — and it suits a corner that already stays damp. If you are unsure, start with the fountain. You can always add the pond later, and a fountain that works will tell you whether the yard wants water at all.
12. Light The Edges And The Paths, Not The Middle

A backyard without lighting disappears at sunset. A backyard with one bright floodlight looks like a parking lot. The yards that feel magical after dark are lit in layers — low lights along the paths, a warm wash on the fence or a tree, and soft string lights over the dining table. Nothing harsh, nothing everywhere.
Light the edges, not the middle. Uplight the specimen tree at the far corner and the lit canopy pulls the eye deep into the yard. Wash light across a fence or a hedge and the boundary pushes outward. Line the path with low fixtures and the route becomes a journey instead of a trip hazard. Flood the middle and every boundary shows — the yard shrinks to a lit box.
Solar stake lights are the easiest start: no wiring, no electrician, and they can be moved until the spacing looks right. Low-voltage fixtures give a warmer, steadier light and are worth the extra step if the yard is used most evenings. Either way, keep the light warm-toned. Cool white light outdoors feels clinical; warm light feels like evening.
Tip: Put the lights on a timer or a dusk sensor. A yard that lights itself at sunset gets used far more than one that needs someone to remember the switch, and it costs less to run than you would expect.
String lights over the dining zone are the finishing touch. Hung from a pergola, between fence posts, or from the house to a tree, they create a ceiling of light that makes the patio feel like a room. Keep the run taut and level — sagging strings look accidental, and a level run looks designed.
13. Shrink The Lawn To The Space You Actually Use

Most yards have too much lawn and not enough of everything else. A big empty rectangle of grass needs mowing, watering, and edging every week, and if nobody plays on most of it, that work buys nothing. The lawn should be sized to its job — and only its job.
Keep lawn where it earns its keep. A 20-by-20-foot patch is plenty for kids and dogs to play on. A narrow strip along the side of the house, or a slope nobody walks on, is lawn that only exists to be mowed. Replace those dead zones with planting beds, gravel, or groundcover, and the yard instantly looks more designed while the mowing shrinks.
Groundcover is the quiet hero here. Creeping thyme, low sedum, or a native groundcover spreads into a dense carpet that suppresses weeds, needs no mowing, and handles foot traffic better than a struggling strip of turf. In deep shade, where grass struggles no matter the seed blend, groundcover or mulched beds are a better answer than another round of reseeding.
Tip: Aim for lawn to cover roughly 30 to 50 percent of the yard, with the rest as patio, beds, and paths. Yards in that range read as gardens with a lawn in them, not lawns with a few plants around the edges.
This is also where a smaller yard has an advantage. If the whole space is compact, our guide to small backyard ideas covers how to make a tight footprint feel bigger — the same zone thinking, scaled down.
14. Put A Pergola Over The Dining Zone

A pergola does something no other feature does: it puts a ceiling over the yard without closing it in. Under it, a dining table feels like a room. The open top lets the breeze through and the sky show, while the beams frame the view and give climbing plants something to hold onto.
Size it to the table plus the chairs. A pergola that barely covers the table leaves the people sitting in the sun. Allow at least two feet of overhang beyond the table on every side, and check the height — seven to eight feet at the beam feels open and comfortable, while anything lower feels cramped once the vines fill in.
Wood gives the warmest look and ages gracefully. Cedar and redwood hold up well outdoors with occasional sealing. Aluminum and vinyl need less upkeep and suit rainy climates. A climbing vine — clematis, wisteria, or climbing roses — turns the beams into a living green roof within a season or two, and the dappled shade it throws is cooler and softer than any fabric.
Tip: Repeat the pergola’s material somewhere else in the yard. Cedar beams with a cedar bench, or black metal posts with black steel edging, tie the structure to the rest of the landscape. A single material appearing twice looks deliberate. Appearing once looks accidental.
If a full pergola is more than the budget allows, a shade sail stretched over the dining zone gives the same overhead shelter for far less money and installs in an afternoon. It will not last as long or look as permanent, but it will tell you whether the dining zone wants a roof before you commit to building one.
15. Finish With Mulch, Crisp Edging, And One Focal Plant

Every idea in this article lands better after one finishing pass: fresh mulch, crisp edges, and a single plant that draws the eye. It is the difference between a yard that is landscaped and a yard that looks landscaped, and it costs less than almost anything else here.
Mulch two to three inches deep. Fresh mulch makes plants stand out against the soil, holds moisture so you water less, suppresses weeds, and regulates soil temperature. Shredded bark or wood chips are the safest choice — they break down slowly and feed the soil as they go. Keep the mulch a few inches away from stems and trunks so it does not hold damp against the bark.
Cut the edges with a half-moon edger or a sharp spade, then hold the line with steel or stone edging. A crisp edge between lawn and bed is visible from the back door, and it is the detail visitors notice first even if they cannot name it. Re-cut the edge once a season and the whole yard keeps its shape.
Tip: Choose one focal plant for the long view from the back door — a small ornamental tree, a sculptural grass, or a large container with a single bold plant. Everything else in the yard should lead the eye toward it, not compete with it. One focal point makes the yard feel composed. Five focal points make it feel noisy.
Stand at the back door and look out. If the first thing you see is a clear path, a defined bed, and one plant worth looking at, the landscaping is done. The rest is maintenance, and maintenance is just the yard paying you back.
How To Put These Ideas Together?
You do not need all 15. Most yards need five or six, chosen in the right order. Start with the zones, then the patio and the path, then the planting layers and the shade tree. Add the fire pit or the pergola when the structure is in place. Finish with the lighting and the mulch. That order — ground, then structure, then planting, then light — is the same order professionals work in, because planting before the hardscape means trampled beds and broken irrigation lines.
Budget works the same way. The ideas that cost the least — the curved bed, the mulch and edging, the smaller lawn, the path lighting — change the yard the most for the money. The ideas that cost the most — the terrace, the pergola, the full patio — are the ones worth saving for and doing once, properly. A backyard patio and deck guide can help you think through the bigger structures before you commit, and our general backyard ideas roundup covers the wider set of features — seating, play areas, and entertaining setups — that sit alongside the landscaping itself.
Give the planting time. Hardscape and lawn settle in one season. Shrubs and perennials fill in over two or three. A shade tree needs five to seven seasons to reach its real size. Design for what the yard will look like in year three, not year one, and the yard will keep getting better while you barely notice it working.
Frequently Asked Questions
How Do I Plan A Backyard Landscape From Scratch?
Start with the three zones every yard needs: a gathering space near the house, a planted edge along the fences, and one open flexible zone for lawn or play. Add the lawn only where it will actually be used, usually a 20-by-20-foot minimum for kids and dogs. Then work in order — drainage and irrigation first, hardscape second, anchor trees and shrubs third, perennials and groundcover fourth, lighting last. For a fuller walkthrough of the planning steps, the team at This Old House covers backyard landscaping planning and design with a practical checklist for measuring, soil testing, and budgeting.
What Is The Cheapest Way To Landscape A Backyard?
Start with the changes that cost the least and show the most: a curved planting bed edged cleanly, two to three inches of fresh mulch, a smaller lawn, and solar path lights. A gravel lounge corner, stepping stones, and container planting are all weekend projects with modest material costs. Save the expensive structures — terracing, pergolas, and full patios — for later, and do them once, properly.
How Much Lawn Should A Backyard Have?
Limit lawn to roughly 30 to 50 percent of the yard and design the rest as patio, beds, and gravel paths. Over-lawning costs more in mowing and watering and reads less designed than a yard with mixed planting. Keep lawn where it is genuinely used for play or gathering, and replace dead strips and shady corners with groundcover or mulched beds.
Which Plants Are Best For A Low Maintenance Backyard?
Choose plants already suited to your climate and soil: native shrubs and perennials, ornamental grasses, and evergreen structure plants. They need less water, less feeding, and less attention than fussy varieties. Group them in drifts of three or five, layer them in three heights, and mulch the beds. Avoid anything that needs weekly deadheading or constant watering unless you enjoy that work.
When Is The Best Time To Start Landscaping A Backyard?
The best time to start is when you can work in the right order: plan and measure first, fix drainage, then build hardscape, then plant. Trees and shrubs establish best when planted in cooler, wetter weather, while patios and paths can be built in any dry spell. Whatever the season, avoid planting in the hottest weeks of summer, when new plants struggle to establish and need constant watering.
A Yard You Will Actually Use
Good backyard landscaping is not about having the most features. It is about having the right ones, in the right places, at the right size. Zones before plants. Furniture before paving. Shade before seating. Light along the edges. A little patience while the planting grows in.
Walk your yard tomorrow morning with a tape measure and a garden hose. Lay out the zones, mark the patio, curve the bed. The yard will tell you what it wants to be — and these 15 ideas give you the pieces to build it.